
Are you struggling to find the perfect finishing touch for your room? Look no further - plaster ceiling roses are the elegant solution you've been searching for. With easy installation and a variety of designs to choose from, these decorative pieces are a must-have for any home. Say goodbye to bland ceilings and hello to sophistication.
What Is A Plaster Ceiling Rose?
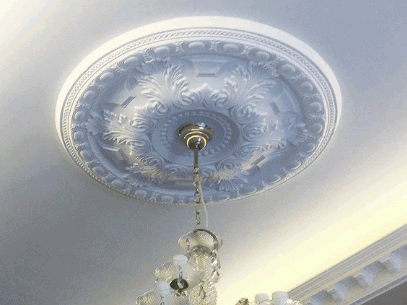
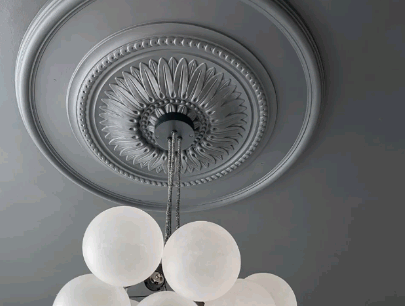
A Plaster Ceiling Rose is a decorative element that is mounted on the ceiling around a light fixture or chandelier. It is typically crafted from plaster or gypsum and is utilized to add elegance and style to a room. The intricate design of the ceiling rose can feature various patterns and motifs, serving as a focal point and enhancing the overall aesthetic of the space.
When selecting a plaster ceiling rose, it is important to consider the size, design, and compatibility with your existing décor. It is recommended to seek guidance from a professional for proper installation to ensure proper fitting and stability.
What Are The Benefits Of Installing A Plaster Ceiling Rose?
- Enhanced aesthetics: A plaster ceiling rose offers numerous benefits that can enhance the aesthetics and functionality of a room, adding a touch of elegance and sophistication to any space.
- Architectural detail: Ceiling roses provide architectural interest, acting as a focal point and drawing attention to the ceiling.
- Hide imperfections: Plaster ceiling roses can conceal any imperfections or flaws in the ceiling, creating a seamless and polished appearance.
- Lighting enhancement: They can also be used to highlight and accentuate lighting fixtures, creating a more visually appealing and well-lit space.

What Tools And Materials Do You Need?
When installing a plaster ceiling rose, there are several tools and materials that you will need. Here is a list of the necessary items:
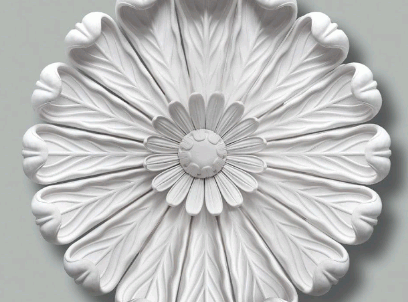
- Plaster ceiling rose: Choose a design and size that will fit your space.
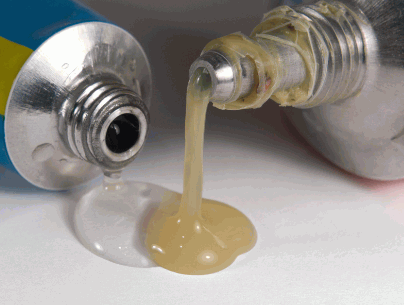
- Adhesive: Use a strong adhesive specifically designed for plaster.
- Measuring tape: Make sure to measure the diameter of the ceiling rose for a proper fit.

- Utility knife: This tool will come in handy for cutting any excess adhesive or plaster.

- Sandpaper: Smooth out any rough edges or imperfections.

- Paint and paintbrush: Apply a coat of paint that matches your ceiling.

By having all of these tools and materials on hand, you can successfully install a plaster ceiling rose in your space.
How To Prepare For Installation?
Before installing a plaster ceiling rose, it is important to properly prepare the space to ensure a smooth and successful installation. This section will cover the necessary steps to take before beginning the installation process. We will discuss techniques for choosing the right placement, checking for any wiring or pipes that may interfere with the installation, and gathering all the necessary tools and materials. By following these steps, you can ensure that your plaster ceiling rose installation goes smoothly and without any hiccups.
1. Choose The Right Placement
Choosing the perfect placement for a plaster ceiling rose is essential in achieving a well-balanced and visually appealing look in your space. To help you in this process, here are some steps to follow:
- Assess the Room: Take into consideration the size and layout of the room to determine the ideal placement for the ceiling rose.
- Focus Point: Select a central location or a specific area where you want to draw attention to the ceiling rose.
- Lighting Fixtures: Consider the placement of any existing or planned lighting fixtures, such as chandeliers or pendant lights, as they can complement the ceiling rose.
- Room Style: Keep in mind the overall aesthetic and style of the room. For example, a large and intricate ceiling rose may suit a formal dining room, while a simpler design may be more suitable for a bedroom or hallway.
- Proportions: Ensure that the size of the ceiling rose is proportionate to the room and ceiling height. A larger room may require a larger ceiling rose to maintain visual harmony.
By thoughtfully considering these factors, you can select the perfect placement for your plaster ceiling rose and elevate the overall look of your space.
2. Check For Wiring And Pipes
Before installing a plaster ceiling rose, it's crucial to carefully check for any wiring and pipes in the designated area to ensure safety and avoid damaging any electrical or plumbing systems.
- Turn off the electricity: Shut off the power supply to the area where the ceiling rose will be installed to avoid any risk of electric shock.
- Inspect the ceiling: Look for any visible wiring or pipes in the area where the ceiling rose will be placed.
- Use a stud finder: Use a stud finder to locate any electrical cables or pipes hidden within the ceiling.
- Avoid drilling or cutting: If you find any wiring or pipes in the vicinity, adjust the placement of the ceiling rose to avoid damaging them during installation.
- Consult a professional: If you are unsure about the location of wiring or pipes, it's best to consult a professional electrician or plumber for guidance.
Plaster ceiling roses have been used for centuries to add elegance and detail to ceilings. The tradition of decorative plasterwork dates back to ancient Rome, where intricate designs adorned grand buildings. In the 18th and 19th centuries, plaster ceiling roses became popular in European and American homes, showcasing the craftsmanship and artistic flair of the time.
3. Gather Tools And Materials
Before installing a plaster ceiling rose, it is crucial to have all the necessary tools and materials at hand. Here is a list of items you will need to complete the installation process:
- Plaster ceiling rose
- Adhesive or plasterboard adhesive
- Screws
- Screwdriver or drill
- Measuring tape
- Pencil
- Sanding block or sandpaper
- Filling compound or caulk
- Primer
- Paint
- Paintbrush or roller
Having these tools and materials prepared beforehand will ensure a seamless installation process for your plaster ceiling rose.
How To Install A Plaster Ceiling Rose?
Plaster ceiling roses are a beautiful and elegant addition to any room. If you’re looking to add some character and charm to your ceiling, then learning how to install a plaster ceiling rose is essential. In this section, we will guide you through the step-by-step process of installing a plaster ceiling rose. From measuring and marking the center to securing the rose with screws, we’ll cover everything you need to know to successfully install a plaster ceiling rose.
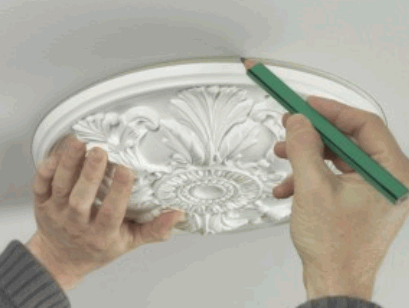
1. Measure And Mark The Center
To ensure that your plaster ceiling rose is perfectly centered and enhances the aesthetics of the room, follow these steps for precise measurement and marking:
- Measure the width and length of the ceiling to locate the center point.
- Divide the width measurement by two to find the midpoint.
- Divide the length measurement by two to find the midline.
- Use a pencil or chalk to mark the center point where the midline and midpoint intersect.
- Double-check the accuracy of your measurements before proceeding with installation.
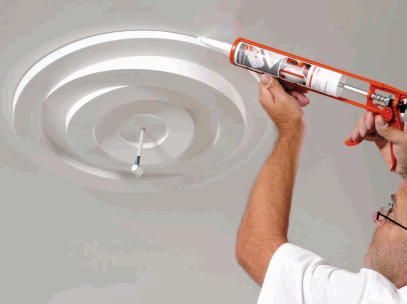
2. Apply Adhesive
When installing a plaster ceiling rose, it is crucial to apply adhesive correctly for a secure and long-lasting installation. Follow these steps to properly apply adhesive:
- Prepare the adhesive according to the manufacturer's instructions.
- Apply a generous amount of adhesive to the back of the ceiling rose using a putty knife or trowel.
- Spread the adhesive evenly, making sure to cover the entire back of the rose.
- Press the ceiling rose firmly against the ceiling, aligning it with the marked center.
- Hold the rose in place for a few minutes to allow the adhesive to bond.
Remember to clean up any excess adhesive before it dries. This step is crucial in achieving a professional and seamless finish.
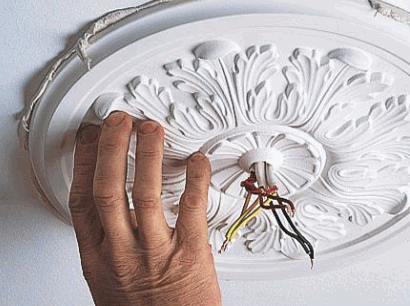
3. Place The Ceiling Rose
To properly place a plaster ceiling rose, follow these steps:
- Measure and mark the center of the ceiling where you want the rose to be positioned.
- Apply adhesive to the back of the ceiling rose, ensuring even coverage.
- Position the ceiling rose over the marked center, pressing firmly to secure it to the ceiling.
- Use screws to further secure the ceiling rose in place, ensuring it is flush against the ceiling.
By carefully following these steps, you can successfully place the ceiling rose and enhance the aesthetic appeal of your space.
4. Secure With Screws
To properly secure a plaster ceiling rose, follow these steps:
- Measure and mark the center of the ceiling rose.
- Apply adhesive to the back of the ceiling rose.
- Place the ceiling rose onto the marked center.
- Secure the ceiling rose with screws, ensuring they are evenly spaced.
Plaster ceiling roses have been used for centuries to add elegance and character to ceilings. Originating in ancient Rome, they were popularized during the Renaissance and became a staple in European architecture. The use of screws to securely fasten ceiling roses became common during the industrial revolution, making installation and removal easier. Today, plaster ceiling roses remain a popular choice for homeowners seeking to add a touch of sophistication to their interiors.
How To Finish And Paint The Plaster Ceiling Rose?
After successfully installing a plaster ceiling rose, the next step is to add the final touches to ensure a polished and seamless look. In this section, we will discuss the necessary steps to finish and paint the plaster ceiling rose. From filling in gaps and cracks to priming and painting, we will cover all the essential techniques to achieve a flawless and professional finish for your ceiling rose. So, let's dive into the details and make your ceiling rose a standout feature in your room.
1. Fill In Any Gaps Or Cracks
To properly fill in any gaps or cracks while installing a plaster ceiling rose, follow these steps:
- Clean the surface: Remove any dust or debris from the designated area.
- Prepare the filler: Mix a plaster or joint compound with water according to the manufacturer's instructions.
- Apply the filler: Use a putty knife to evenly apply the filler to the gaps or cracks.
- Level the surface: Use the putty knife to level the filler with the surrounding ceiling surface.
- Let it dry: Allow the filler to completely dry before proceeding.
- Sand down: Use sandpaper to smooth out any rough edges or uneven areas.
- Prime and paint: Apply a primer and paint the ceiling rose to match the surrounding area.
2. Sand Down Any Rough Edges
Sanding down rough edges is an important step in finishing a plaster ceiling rose installation. Here is a list of steps to follow:
- Start by wearing safety goggles and a dust mask to protect yourself.
- Use a medium-grit sandpaper to gently sand any rough edges or imperfections on the surface of the ceiling rose.
- Hold the sandpaper flat against the surface and move it in a circular motion or back and forth to smooth out any rough areas.
- Be careful not to apply too much pressure, as this could damage the plaster. Let the sandpaper do the work.
- Continue sanding until all rough edges are smoothed out and the surface feels even to the touch.
- Once you are satisfied with the smoothness, wipe away any dust or debris using a clean cloth.
- Inspect the ceiling rose closely for any remaining rough spots and repeat the sanding process if necessary.
- After sanding, you can proceed to prime and paint the ceiling rose to achieve the desired finish.
Uncover more: How To Plaster Skim A Wall
3. Prime And Paint The Ceiling Rose
To properly prime and paint a plaster ceiling rose, follow these steps:
- Fill in any gaps or cracks with filler and allow it to dry.
- Sand down any rough edges to create a smooth surface.
- Apply a primer to the ceiling rose as a base for the paint.
- Allow the primer to fully dry.
- Paint the ceiling rose using your desired color and finish.
- If necessary, apply multiple coats, allowing each coat to dry before applying the next.
What Are Some Tips For Installing A Plaster Ceiling Rose?
Installing a plaster ceiling rose can be a challenging task, but with some helpful tips, it can be done effectively. Here are some suggestions for a successful installation:
- Preparation: Before starting, make sure the ceiling surface is clean and dry.
- Marking: Use a pencil to accurately mark the position of the ceiling rose for precise placement.
- Adhesive: To ensure maximum adhesion, evenly spread a strong adhesive on the back of the rose.
- Placement: Carefully position the rose on the ceiling, aligning it with the previously made marks.
- Fixing: Press the rose firmly against the ceiling and hold for a few minutes until the adhesive sets to secure it in place.
By following these tips, you can achieve a beautifully installed plaster ceiling rose that adds to the aesthetic appeal of your space.
What Are Some Common Mistakes To Avoid?
When installing a plaster ceiling rose, it's crucial to avoid common mistakes that can impact the final result. To ensure a successful installation, keep these key points in mind:
- Accurate measurement: Take precise measurements to ensure the ceiling rose is centered and properly aligned.
- Appropriate adhesive: Use the correct adhesive for plaster to guarantee a strong and durable bond.
- Adequate support: Make sure the ceiling is adequately supported before attaching the rose to prevent any sagging or damage.
- Take your time: Avoid rushing the process and carefully follow the instructions for a clean and professional finish.
- Safety first: Wear proper protective gear and take necessary safety precautions to avoid accidents or injuries during the installation process.